I was working with vRealize Automation blueprints when i ran into a very interesting requirement. From vRA 7.1 onward, VMware introduced AD Policies which can automate creation of AD computer account during machine provisioning which is a very helpful feature. After upgrading environment from vRA 6.2 to vRA 7.3, I got requirement to automate AD computer account creation process. But this is where i ran into challenges:
- Customer is using predefined hostnames in DNS, so they were using a workflow to take temporary machine prefix generated by vRA and replaced it with hostname reserved in DNS based on IP assigned to machine.
- They had different blueprints and need to ensure that AD computer account is created in different Organization Unit in AD.
- When using AD Policies, it creates computer account with tempname assigned to machine.
- If computer account already exists in AD, then skip account creation.
So without further wait lets dive into Solution:
Solution Overview:
Step by Step Guide:
- Let’s first start with creation of vRO workflow which we will use in Machine Provisioning Lifecycle.
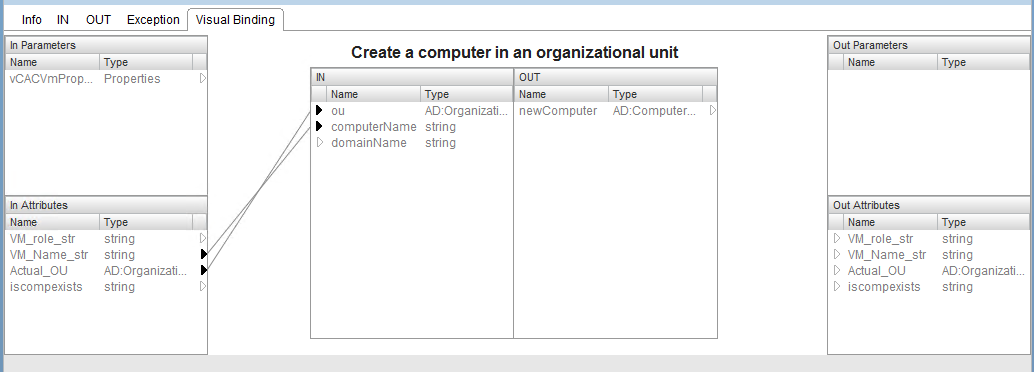
Step 1: Clone the workflow “Create a computer in an organization unit” from location : Library -> Microsoft -> Active Directory -> Computer
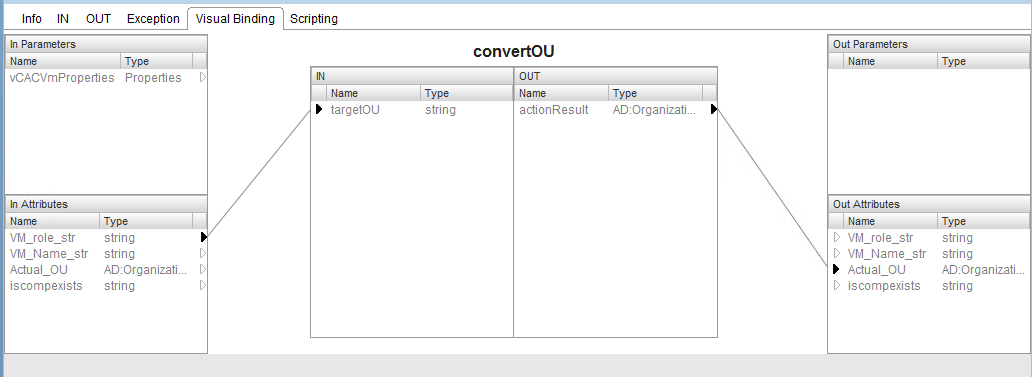
Step 2: Create an action with name convertOU with below code:
Temp = "OU="+targetOU+",OU=lab,DC=base,DC=local";

var searchOU = Temp.split("=")[1].split(",")[0];
System.log("Search OU: " +searchOU);

var ouArray = ActiveDirectory.search("OrganizationalUnit", searchOU);
System.log("ouArray is:"+ouArray);

var ouIndex = ouArray.map(function(e) { return e.distinguishedName.toLowerCase(); }).indexOf(Temp.toLowerCase());

if (ouIndex > -1) {
    ou = ouArray[ouIndex];
    System.log("Found OU: " +ou.distinguishedName);
    return ou;
} else {
    throw("OU not found");
}
Return Type of Action: AD:OrganizationalUnit, Parameter: targetOU (string)
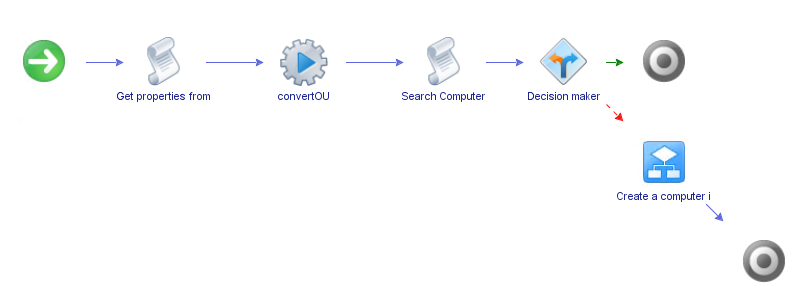
Step 3: Create a new workflow “ad auto join” and add elements as per workflow shown in Solution Overview.
Step 4: First scriptable task, visual binding should be as below:

Code for scriptable task is:
var machine = vCACVmProperties.get("machine");

if (machine != null){
	virtualmachineID = machine.get("id");
	var VM_Name_str = machine.get("name");
}

var machineprop = machine.get('properties');
var VM_role_str = getcustprop("serverOU");

function getcustprop(propname)
{
	var prop = machineprop.get(propname);
	if ( typeof prop != "string"){
		throw("cannot read prop name");
	}
	return prop;
}
Step 5: Add Action created earlier and perform visual binding as per below:
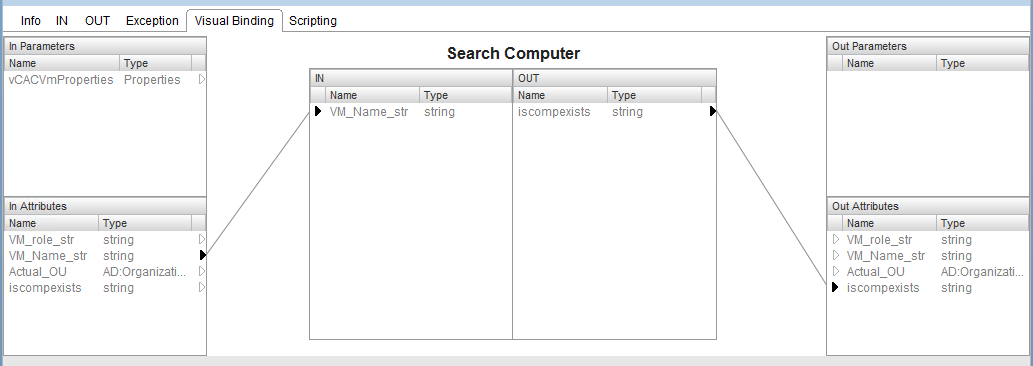
Step 6: Create a second scriptable task and perform visual binding and coding as per below:
System.log("Search Computer: " + VM_Name_str);

var ouarray = ActiveDirectory.search("ComputerAD",VM_Name_str);
System.log("ouArray is:"+ouarray);

if (ouarray != "") {
	System.log("Found computer: " + ouarray);
	iscompexists = "true";
} else {
	System.log("Computer Not Found");
	iscompexists = "false";
}
Step 6: Add a decision maker and define in as “iscompexists”.
if (iscompexists == "true"){
 	System.log(iscompexists);
	return true;
}
else {
	System.log(iscompexists);
	return false;
}
Step 7: Insert cloned workflow (cloned in step 1) at negative of decision maker and perform visual binding in given fashion:
- Ok. So our workflow is ready and can be used in vRA during machine lifecycle. Now, we will modify blueprint in vRA and add an event subscription.
Step 1: Go to blueprints, and add below custom properties to your blueprint. serverOU will contain name of OU in which you want to create computer account.

Step 2: Head over to Events -> Subscriptions and create a new subscription with below properties:
- Event Topic – Machine provisioning
- Conditions –
Lifecycle State Name Equals VMPSMasterWorkflow32.MachineProvisioned
Lifecycle State Phase Equals PRE
Blueprint name contain <your blueprint name> - Workflow – Select the newly created workflow
- Make sure to mark it as Blocking
Step 3: Publish the subscription.
Note:
If you are seeing any errors, please check that you have run “Configure Active Directory plug-in Option” in vRO.
I hope you like the post. Let me know your thoughts. Signing Out for now.
