In this blog we will be looking at how to install ESXi, what are different methods to install ESXi and initial configuration after installation. This blog is divided in two sections, first section we will see how to install ESXi and in second section, we will look at configuration. I will only give brief about Auto Deploy as deploying ESXi using Auto Deploy is itself a whole different topic. If you would like to know more about Auto Deploy, let me know in comments and I will cover it as a separate blog. So without wasting any more time, let’s dig right into it.
Installing ESXi
We can install ESXi using three methods:
- Interactive Installation
- Scripted Installation
- Auto Deploy
Interactive installation is probably the easiest installation which can be done without any special pre-requisites. But if not done correctly it can be a nightmare as well. So let’s explore each section one by one:
Deploy ESXi using Interactive Installation
Generally interactive installation is done for smaller environment, reason being manual configuration.
In Interactive Installation, boot server either using bootable CD/DVD or USB drive, run ESXi installer and respond to ESXi installer prompt which will appear during installation. It will reformat target disk and create partition and create a VMFS datastore and install ESXi boot image. If target disk contains any ESXi installation then it will give you option to upgrade it.
Step by Step Guide
Step 1 – Boot server with ESXi installer CD/DVD/USB

Step 2 – ESXi installer will start loading

Step 3 – Press Enter to start installation

Step 4 – Press F11 to accept EULA.

Step 5 – Press Enter to Select the device on which to install ESXi image.

Step 6 – Select Keyboard layout.

Step 7 – Enter root password and press Enter.

Step 8 – Press F11 to start installation.

Step 9 – This conclude our installation of ESXi.
Deploy ESXi using Scripted Installation
Scripted installation is used to deploy multiple hosts efficiently as installations can be done as unattended. Script contain all the installation settings and it can be applied to all hosts which have similar configuration.
First you will create a script using commands, you can edit the script so it can be used for hosts for different settings and save it in below location:
- FTP server
- HTTP/HTTPS server
- NFS Server
- USB Flash Drive
- CD-ROM Drive
If multiple hosts with first disk as boot needs to be deployed then a single script will suffice, if ESXi hosts with different boot disk needs to be deployed then create multiple script.
Creating Installation and Upgrade Scripts
Install/Upgrade script is a text file which contain supported commands, this command section specifies installation configuration and is required. Default install script is ks.cfg.
Default script contains following commands:
#
# Sample scripted installation file
#
# Accept the VMware End User License Agreement
vmaccepteula
# Set the root password for the DCUI and Tech Support Mode
rootpw myp@ssw0rd
# Install on the first local disk available on machine
install --firstdisk --overwritevmfs
# Set the network to DHCP on the first network adapter
network --bootproto=dhcp --device=vmnic0
# A sample post-install script
%post --interpreter=python --ignorefailure=true
import time
stampFile = open('/finished.stamp', mode='w')
stampFile.write( time.asctime() )
Required Commands in Installation Script:
accepteula or vmaccepteula – Accept the VMware EULA
rootpw (–isencrypted) – Specified root password, inencrypted specify if password value is encrypted
install/upgrade/installorupgrade – Any one option out of three is required and there underlying options
- –disk or –drive – specifies disk name on which ESXI will be installed
- –firstdisk – specifies first disk will be used for installation, storage is processed as follows
- Local Storage
- Network Storage
- USB
Optional Commands in Installation Script:
- Clearpart – clear the partition present on disk, it required that install must be specified
- Dryrun – it doesn’t perform installation, only parses and check installation script
- Keyboard – specifies keyboard layout of system
- Serialnum or vmserianum – specify licence key of vSphere
- Network – secifies network addresses of system
- Paranoid – if warning appears, it will interrupt installation
- Part or partition – create additional VMFS datastore on system
- Reboot – reboot system
- %include or include – specifies another script to parse into installation
- %pre – specifies script to run before kickstart configuration is evaluated
- %post – specifies scrupt to run after package installation
- %firstboot – create init script to run during only firstboot
Install ESXi using Script from CD/DVD or USB
Step 1 – Boot the ESXi from local CD or DVD or USB
Step 2 – When ESXi Installer Window appear, press Shift + O to enter boot options

Step 3 – Enter location of installation script to install ESXi using install/upgrade script created earlier.
Boot option has from ks=

Step 4 – Press Enter. ESXi will be installed or upgraded using script and options specified in script.
Install ESXi using Script from PXE Boot
Workflow of PXE Boot:

Step 1 – Boot the ESXi target host
Step 2 – Target ESXi host makes a DHCP request
Step 3 – DHCP server provides IP and TFTP server information to target host.
Step 4 – Target host contact TFTP server for file specified by DHCP server.
Step 5 – TFTP server provides network boot loader and target host execute it.
Step 6 – Boot loader search for configuration file on TFTP server, download the kernel and other components from HTTP server or TFTP server and boot the kernel in ESXi host.
Step 7 – Installer run unattended using kickstart script specified in configuration file else it runs interactively.
Creation of PXE boot environment is very well explained in VMware docs. I have provided link below, please follow steps to build PXE environment.
Deploy ESXi using Auto Deloy
Using Auto Deploy you can provision multiple ESXi efficiently. ESXi hosts are network booted from a central auto deploy server. Optionally, hosts are configured with a host profile of a reference host. The host profile can be set up to prompt the user for input. After boot up and configuration complete, the hosts are managed by vCenter Server just like other ESXi hosts.
Two types of install:
- Stateless Caching: Default configuration. Auto Deploy doesn’t store ESXi boot image on local hard disk. But image profile defines image the host is booted with and other host attribtues are managed through host profile. Every time host boot it load image from Auto Deploy server.
- Stateful installs: In stateful installs, ESXi host is deployed from Auto Deploy server but image is stored on local HDD and subsequent boots are done from local hard drive.
Architecture of Auto Deploy:

- vSphere AutoDeploy Server: It serves image and host profile to target ESXi host
- Rule Engine: Administrator defines different rules which sends infromtion to Auto Deploy server about which image profile and host profile needs to be send to target ESXi host
- Image Profile: It defines which VIB will be included in ESXi boot
- Host Profile: It defines machine specific configuration
- Host Customization: It stores user information which is provided when host profile are applied to hosts
vSphere Auto Deploy Boot process
When you boot a host that you want to provision or re-provision with vSphere Auto Deploy, the vSphere Auto Deploy infrastructure supplies the image profile and, optionally, a host profile, a vCenter Server location, and script bundle for that host.
The boot process is different for hosts that have not yet been provisioned with vSphere Auto Deploy (first boot) and for hosts that have been provisioned with vSphere Auto Deploy and added to a vCenter Server system (subsequent boot).
I will stop here on Auto Deploy as it’s a topic with very large information. If you would like to know more about Auto Deploy let me know in comments and will cover it for you as a separate article.
Setting Up ESXi
When you take console of ESXi host you will be presented with DCUI (Direct Console User Interface). It’s a keyboard only interaction and no mouse is allowed. You can perform initial configuration or troubleshooting from DCUI. Important keys to remember here:
- F2 – Login into DCUI and view and change configuration
- F12 – Shut down or restart ESXi host
- Alt + F12 – View vmkernel logs
- Alt + F1 – Switch to shell console
- Alt + F2 – Switch to DCUI mode
Configure ESXi from DCUI
Step 1 – Login into ESXi DCUI by pressing F2 and providing root credentials.

Step 2 – If you need to change root password, select Configure Password
Step 3 – Select Configure Management Network to configure management IP, DNS configuration, hostname etc.

Step 4 – After configuring press Enter to Accept changes, Press ESC to exit network configuration and then press Y to accept changes by restarting management network.

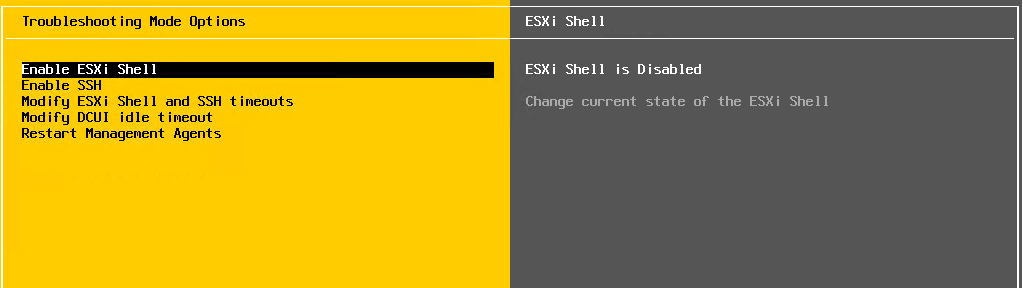
Step 5 – Use Troubleshooting Options to Enable ESXi Shell ,SSH or Restart Management Network.
Step 6 – You can view system logs as well from DCUI. Reset System Configuration will put ESXi host in Default Configuration and all settings will be lost.

Other Important Configuration
Configure Security Banner:
Step 1 – Login into Host client or web client
Step 2 – Navigate to Manage -> Settings -> Advanced System Settings -> Annotations
Configure Scratch Partition:
Step 1 – Login into Host client or web client
Step 2 – Navigate to Manage -> Settings -> Advanced System Settings
Step 3 – Below settings will configure scratch partition:
ScratchConfig.CurrentScratchLocation – It shows current configured scratch location

ScratchConfig.ConfiguredScratchLocation – Enter new value of scratch partition
Step 4 – Restart ESXi host to reflect changes
Configure System Logging to remote host
Step 1 – In the vSphere Web Client inventory, select the host.
Step 2 – Click Configure.
Step 3 – Under System, click Advanced System Settings.
Step 4 – Filter for syslog.
Syslog.global.LogHost – Remote host to which log messages are forwardedStep 5 – Changes reflect immediately.
Further Reading and Reference:
This covers here our exam objective 4.4. I hope you enjoy it reading as much as I feel writing it. Feedback and corrections are welcome as always.
