This is a very delayed post which was roaming in my head for a long time. I always wanted to deploy a fully functional lab for VCF on my home system to play around with API and automation. There is execellent tool VLC (VCF Lab Constructor) which will help you prepare base infrastructure and deploy VCF to play around with. But in my case, it is bit different as I am using VMware Workstation and wanted to experience bring up process. In this multi part series, I will cover how to deploy VCF and then Edge Cluster to have a functional Consolidated Management Domain.
A bit about my setup
I am using a desktop with AMD Ryzen processor, 128 GB Memory and 1 TB SSD running with Windows 11 Pro. We can use Hyper-V as our hypervisor but I find it much easier to use VMware Workstation.
Few Tips for using VMware workstation with Windows 11
- Disable Virtualization based security in Windows as it interfere with VMware Workstation
- Disable Hyper-V if you like to use VMware Workstation
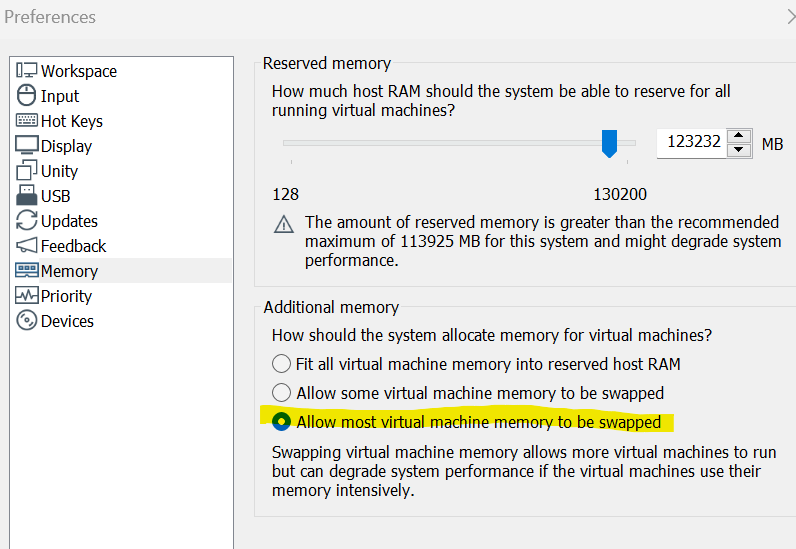
- Set Additional Memory to “Allow most virtual machine memory to be swapped” in Memory prefrences
Base Virtual Machines
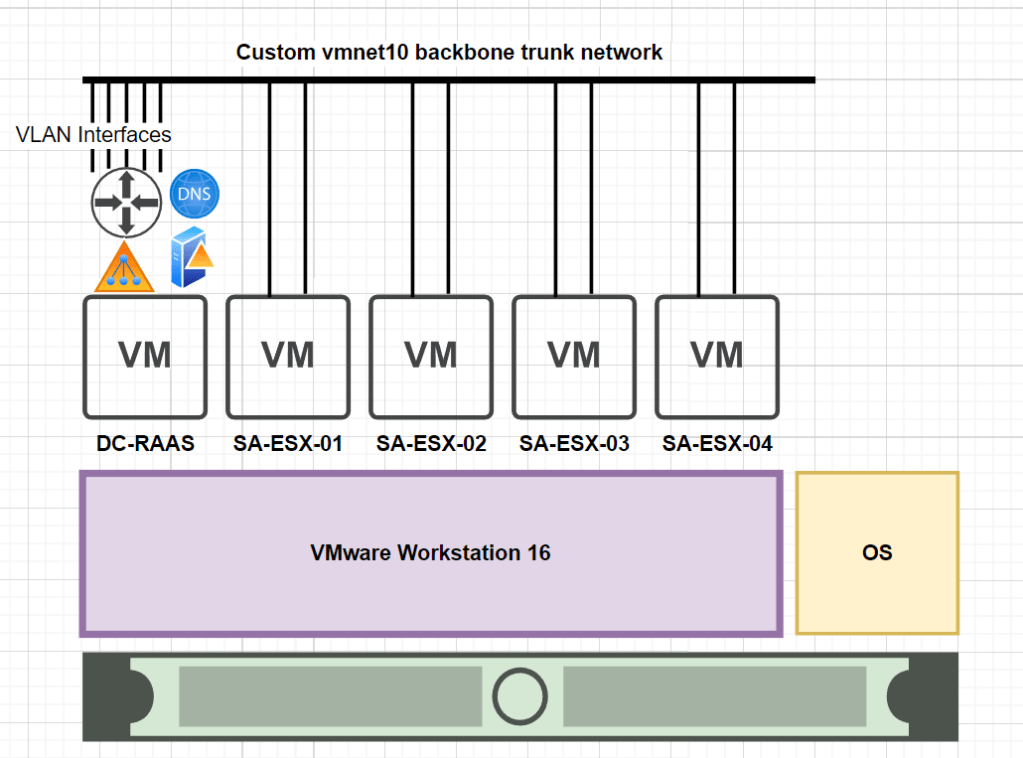
At the very minimum, we need 5 Virtual Machines and one temporary VM to host Cloud Builder. I am running below machines to bringup VCF –
- DC-RAAS – Hosts Active Directory, DNS, DHCP, NTP, Routing Services. You can use Vyos or similar appliacne to host routing functionality
- SA-ESX-01 – VCF Management ESXi Host – 1
- SA-ESX-02 – VCF Management ESXi Host – 2
- SA-ESX-03 – VCF Management ESXi Host – 3
- SA-ESX-04 – VCF Management ESXi Host – 4
| VM Name | vCPU | Memory | Storage |
| DC-RAAS | 2 | 4 GB | 60 GB |
| SA-ESX-01 | 8 | 64 GB | 16 GB, 60 GB, 600 GB |
| SA-ESX-02 | 8 | 64 GB | 16 GB, 60 GB, 600 GB |
| SA-ESX-03 | 8 | 32 GB | 16 GB, 60 GB, 600 GB |
| SA-ESX-04 | 8 | 32 GB | 16 GB, 60 GB, 600 GB |
Backbone Network layer
For backbone, I created a new custom network in VMware workstation and attached it to all the VMs as shown in above diagram. Post which, I created a team interface in Windows Server and created multiple Team Interface which carry different VLANs. This approach help me logically separate traffic and provide different VLAN IDs required for VCF bringup. Windows RAS services provide routing services between all these different VLANs.
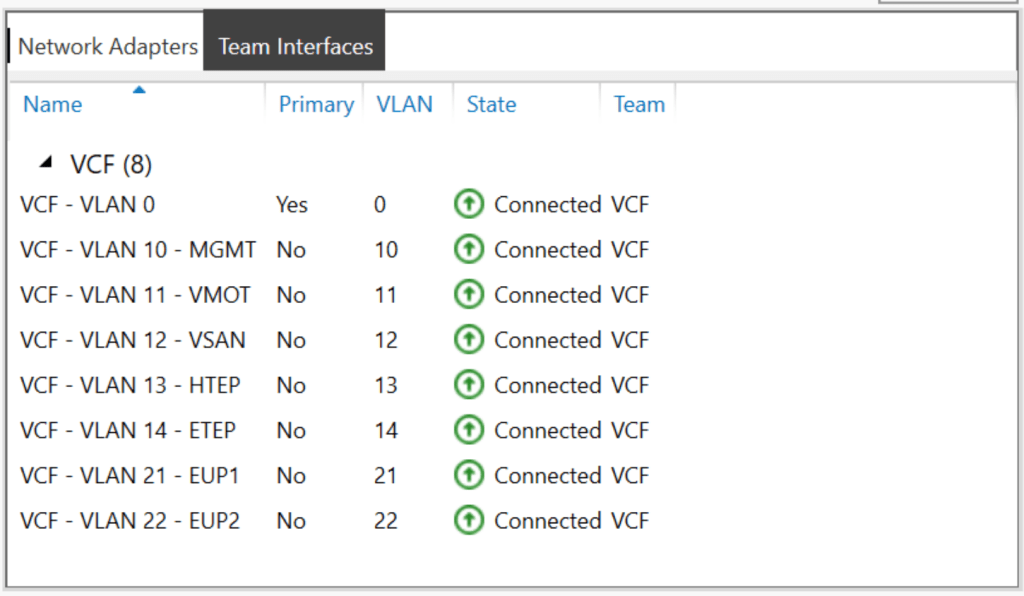
Why there is a VLAN 0 configured, when we deploy Cloud Builder, it doesn’t provide an option to provide VLAN ID. So using VLAN 0 can help connect to devices running on untagged network. Also, 2nd interface has been connected with an interface to my base OS to provide routing capability between base OS and Nested VM.

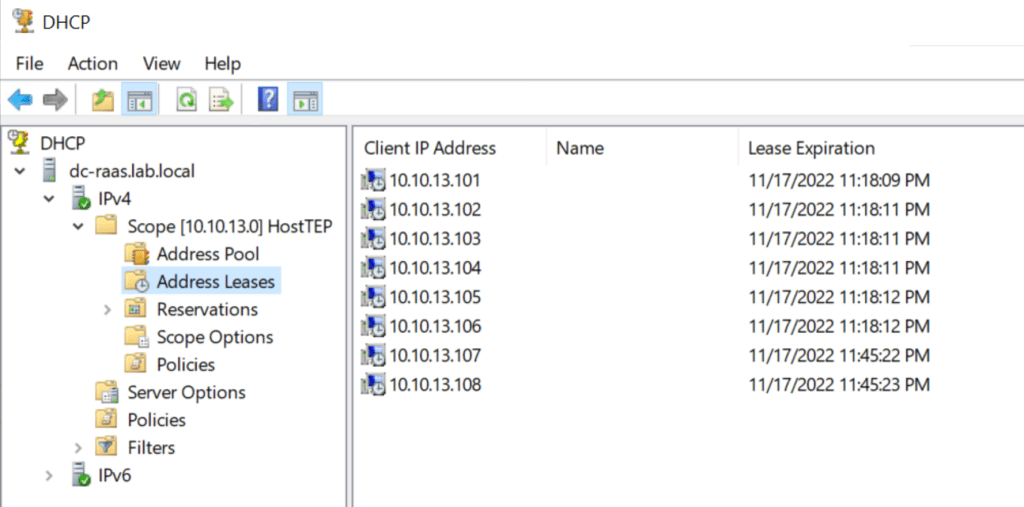
DHCP has been enabled on same server to provide IP Addressed to HOST TEP interface.
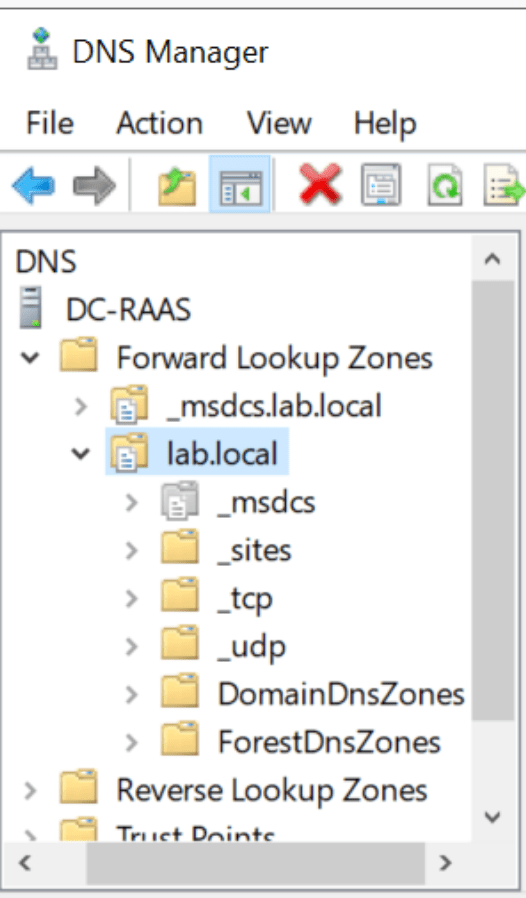
DNS has been enabled and integrated with AD to host A/PTR records.
Few tips of vcf esxi build
- If you are using tagged network, ensure you change VLAN ID on VM Network on vswitch0 to same as management VLAN
- Change Domain Name in Default TCP/IP stack to reflect correct domain name and then run /sbin/generate-certificate to generate certificate with FQDN
- Ensure NTP Details are updated and ESXi host synced with NTP Server
- Create first two hosts with atleast 64 GB of RAM, When Cloud Builder deploys NSX-T, it reserves the entire RAM for NSX-T Manager.
- Last 2 hosts can be deployed with 32 GB of RAM, I encountered issue with 16 GB of RAM as it fails the VIB installation of NSX-T agent
- Ensure all DNS records are created in advance
- If you are using HDD instead of SSD, ensure to mark devices in ESXi host as Flash disk
SAmple json spec for bringup
We can convert Excel parameter file to JSON spec file using cloud builder SOS utility. This helps in customizing deployment for Lab, as we can force 1 NSX-T Manager instead of standard 3 NSX-T manager which saves a lot of resources. There is a sample JSON in VLC bundle as well which serves same function.
Using the SoS Utility to convert Excel to JSON
Sample JSON Spec –
{
    "subscriptionLicensing": false,
  "skipEsxThumbprintValidation": true,
  "managementPoolName": "sa-mgmt-np01",
  "sddcManagerSpec": {
    "secondUserCredentials": {
      "username": "vcf",
      "password": "VMware123!"
    },
    "ipAddress": "10.10.10.4",
    "netmask": "255.255.255.0",
    "hostname": "sa-sddc-mgr",
    "rootUserCredentials": {
      "username": "root",
      "password": "VMware123!"
    },
    "localUserPassword": "VMware123!VMware123!",
    "vcenterId": "vcenter-1"
  },
  "sddcId": "sa-mgmt",
  "esxLicense": "<INSERT LIC>",
  "taskName": "workflowconfig/workflowspec-ems.json",
  "ceipEnabled": false,
  "fipsEnabled": false,
  "ntpServers": ["192.168.182.128"],
  "dnsSpec": {
    "subdomain": "lab.local",
    "domain": "lab.local",
    "nameserver": "192.168.182.128"
  },
  "networkSpecs": [
    {
      "networkType": "MANAGEMENT",
      "subnet": "10.10.10.0/24",
      "gateway": "10.10.10.1",
      "vlanId": "10",
      "mtu": "1500",
      "portGroupKey": "sfo01-m01-cl01-vds01-pg-mgmt",
      "standbyUplinks":[],
      "activeUplinks":[
        "uplink1",
        "uplink2"
      ]
    },
    {
      "networkType": "VMOTION",
      "subnet": "10.10.11.0/24",
      "gateway": "10.10.11.1",
      "vlanId": "11",
      "mtu": "8940",
      "portGroupKey": "sfo01-m01-cl01-vds01-pg-vmotion",
      "association": "sa-dc01",
      "includeIpAddressRanges": [{"endIpAddress": "10.10.11.111", "startIpAddress": "10.10.11.101"}],
      "standbyUplinks":[],
      "activeUplinks":[
        "uplink1",
        "uplink2"
      ]
    },
    {
      "networkType": "VSAN",
      "subnet": "10.10.12.0/24",
      "gateway": "10.10.12.1",
      "vlanId": "12",
      "mtu": "8940",
      "portGroupKey": "sfo01-m01-cl01-vds01-pg-vsan",
      "includeIpAddressRanges": [{"endIpAddress": "10.10.12.111", "startIpAddress": "10.10.12.101"}],
      "standbyUplinks":[],
      "activeUplinks":[
        "uplink1",
        "uplink2"
      ]
    }
  ],
  "nsxtSpec":
  {
    "nsxtManagerSize": "small",
    "nsxtManagers": [
      {
          "hostname": "sa-nsx-01",
          "ip": "10.10.10.21"
      }
    ],
    "rootNsxtManagerPassword": "VMware123!VMware123!",
    "nsxtAdminPassword": "VMware123!VMware123!",
    "nsxtAuditPassword": "VMware123!VMware123!",
    "rootLoginEnabledForNsxtManager": "true",
    "sshEnabledForNsxtManager": "true",
    "overLayTransportZone": {
        "zoneName": "sa-mgmt-tz-overlay01",
        "networkName": "netName-overlay"
    },
    "vlanTransportZone": {
        "zoneName": "sa-mgmt-tz-vlan01",
        "networkName": "netName-vlan"
    },
    "vip": "10.10.10.20",
    "vipFqdn": "sa-nsx",
    "nsxtLicense": "<INSERT LIC>",
    "transportVlanId": 13
  },
  "vsanSpec": {
      "vsanName": "vsan-1",
      "licenseFile": "<INSERT LIC>",
      "vsanDedup": "false",
      "datastoreName": "sa-vsan01"
  },
  "dvsSpecs": [
    {
      "dvsName": "sfo-m01-cl01-vds01",
      "vcenterId":"vcenter-1",
      "vmnics": [
        "vmnic0",
        "vmnic1"
      ],
      "mtu": 9000,
      "networks":[
        "MANAGEMENT",
        "VMOTION",
        "VSAN"
      ],
      "niocSpecs":[
        {
          "trafficType":"VSAN",
          "value":"HIGH"
        },
        {
          "trafficType":"VMOTION",
          "value":"LOW"
        },
        {
          "trafficType":"VDP",
          "value":"LOW"
        },
        {
          "trafficType":"VIRTUALMACHINE",
          "value":"HIGH"
        },
        {
          "trafficType":"MANAGEMENT",
          "value":"NORMAL"
        },
        {
          "trafficType":"NFS",
          "value":"LOW"
        },
        {
          "trafficType":"HBR",
          "value":"LOW"
        },
        {
          "trafficType":"FAULTTOLERANCE",
          "value":"LOW"
        },
        {
          "trafficType":"ISCSI",
          "value":"LOW"
        }
      ],
      "isUsedByNsxt": true
    }
  ],
  "clusterSpec":
  {
    "clusterName": "sa-cl01",
    "vcenterName": "vcenter-1",
    "clusterEvcMode": "",
    "vmFolders": {
      "MANAGEMENT": "sa-mgmt-fd-mgmt",
      "NETWORKING": "sa-mgmt-fd-nsx",
      "EDGENODES": "sa-mgmt-fd-edge"
    },
    "resourcePoolSpecs": [{
      "name": "sa-m01-cl01-rp-sddc-mgmt",
      "type": "management",
      "cpuReservationPercentage": 0,
      "cpuLimit": -1,
      "cpuReservationExpandable": true,
      "cpuSharesLevel": "normal",
      "cpuSharesValue": 0,
      "memoryReservationMb": 0,
      "memoryLimit": -1,
      "memoryReservationExpandable": true,
      "memorySharesLevel": "normal",
      "memorySharesValue": 0
    }, {
      "name": "sa-m01-cl01-rp-sddc-edge",
      "type": "network",
      "cpuReservationPercentage": 0,
      "cpuLimit": -1,
      "cpuReservationExpandable": true,
      "cpuSharesLevel": "normal",
      "cpuSharesValue": 0,
      "memoryReservationPercentage": 0,
      "memoryLimit": -1,
      "memoryReservationExpandable": true,
      "memorySharesLevel": "normal",
      "memorySharesValue": 0
    }, {
      "name": "sa-m01-cl01-rp-user-edge",
      "type": "compute",
      "cpuReservationPercentage": 0,
      "cpuLimit": -1,
      "cpuReservationExpandable": true,
      "cpuSharesLevel": "normal",
      "cpuSharesValue": 0,
      "memoryReservationPercentage": 0,
      "memoryLimit": -1,
      "memoryReservationExpandable": true,
      "memorySharesLevel": "normal",
      "memorySharesValue": 0
    }, {
      "name": "sa-m01-cl01-rp-user-vm",
      "type": "compute",
      "cpuReservationPercentage": 0,
      "cpuLimit": -1,
      "cpuReservationExpandable": true,
      "cpuSharesLevel": "normal",
      "cpuSharesValue": 0,
      "memoryReservationPercentage": 0,
      "memoryLimit": -1,
      "memoryReservationExpandable": true,
      "memorySharesLevel": "normal",
      "memorySharesValue": 0
    }]
  },
  "pscSpecs": [
    {
      "pscId": "psc-1",
      "vcenterId": "vcenter-1",
      "adminUserSsoPassword": "VMware123!",
      "pscSsoSpec": {
        "ssoDomain": "vsphere.local"
      }
    }
  ],
  "vcenterSpec": {
      "vcenterIp": "10.10.10.12",
      "vcenterHostname": "sa-vc-01",
      "vcenterId": "vcenter-1",
      "licenseFile": "<INSERT LIC>",
      "vmSize": "tiny",
      "storageSize": "",
      "rootVcenterPassword": "VMware123!"
  },
  "hostSpecs": [
    {
      "association": "sa-dc01",
      "ipAddressPrivate": {
        "ipAddress": "10.10.10.101"
      },
      "hostname": "sa-esx-01",
      "credentials": {
        "username": "root",
        "password": "VMware123!"
      },
      "vSwitch": "vSwitch0",
      "serverId": "host-1"
    },
    {
      "association": "sa-dc01",
      "ipAddressPrivate": {
        "ipAddress": "10.10.10.102"
      },
      "hostname": "sa-esx-02",
      "credentials": {
        "username": "root",
        "password": "VMware123!"
      },
      "vSwitch": "vSwitch0",
      "serverId": "host-2"
    },
    {
      "association": "sa-dc01",
      "ipAddressPrivate": {
        "ipAddress": "10.10.10.103"
      },
      "hostname": "sa-esx-03",
      "credentials": {
        "username": "root",
        "password": "VMware123!"
      },
      "vSwitch": "vSwitch0",
      "serverId": "host-3"
    },
    {
      "association": "sa-dc01",
      "ipAddressPrivate": {
        "ipAddress": "10.10.10.104"
      },
      "hostname": "sa-esx-04",
      "credentials": {
        "username": "root",
        "password": "VMware123!"
      },
      "vSwitch": "vSwitch0",
      "serverId": "host-4"
    }
  ],
  "excludedComponents": ["AVN", "EBGP"]
}
conclusion
Congrautlations, We have covered pre-requisities for VCF BringUP. We are half way there. As the saying goes, preparation is half the battle. In next part, we will look at deployment of VCF using cloud builder on our prepared infrastructure. Till then, post any queries or questions you might have.

2 thoughts on “Deploy VCF 4.5 Lab on AMD Ryzen – Part 1”