As part of this blog we will look at how to configure virtual networking. This blog covers exam objective 1.8 as well i.e. Differentiate between vSS and vDS.
vSphere 6.7 exam has two objective, one is configuring and other is managing virtual networking. So I will divide this blog in two part series. In part one I will cover basic of virtual networking, how to setup vSphere standard switch and vSphere distributed switch, configuring VMkernel networking and some other topics. In second part of blog we will cover objective 7.1 which talks about managing virtual networking. So let’s jump right into it.
Understanding Virtual Networking
When we say virtual networking or virtual switches, we are not virtualizing physical switches. We can virtualize enterprise network using NSX but that is topic for another day. In vSphere, virtual networking talks about network of virtual machines running on physical machine connected logically to each other so they can send or receive data from one another. To understand it lets take an example.
Suppose you are running 40 VMs on a single physical server. Now you need to enable network communication on these 40 VMs, so you will need 40 virtual NICs. Now it will not be feasible to attach 40 NICs on your physical server or will it be?
This is where virtual networking comes in. It provide connectivity to these 40 VMs with each other as well as with outside world.
For setting up virtual networking, vSphere provide two types of switches:
- vSphere Standard Switch : It is similar to your physical switch. It detects virtual machines connected to its virtual ports and uses this information to forward traffic to correct virtual machines. It can be connected to physical switch using physical Ethernet adapter termed as uplink to provide connectivity between physical world and virtual world.
- vSphere distributed Switch : Distributed switch acts as a single switch for all associated hosts. It provide centralized management, administration and monitoring of virtual networks in a datacentre. Its configuration is done at vCenter level and it is further propagated to all associated hosts.
Services provided by Virtual Network
In vSphere virtual network there are three types of communication or services which needs to be established. These are:
- Connecting virtual machines with each other
- Connecting virtual machines to physical world
- Connecting vmkernel services (Management, vMotion, vSAN, iSCSI, FT Logging etc.) to physical world
In further section, we will discuss these two type of switches in details.
Configuring vSphere Standard Switch (VSS)
We can use standard switches to provide network connectivity to hosts and virtual machines. A standard switch can bridge traffic internally between virtual machines in the same VLAN and link to external networks.
vSphere Standard Switch Architecture

In virtual switch there are three types of ports which are:
- VM Port Group: VM port provide connectivity to virtual machines. VM ports carry the traffic to and from virtual machines.
- VMkernel Port: VMkernel port provide connectivity to ESXi services, vmkernel port carry traffic to and from various vmkernel services such as vmotion, management etc.
- Uplink Port: Uplink provide connectivity to physical world. They carry traffic to and from physical world.
To provide network connectivity to hosts and virtual machines, you connect the physical NICs of the hosts to uplink ports on the standard switch. Virtual machines have network adapters (vNICs) that you connect to port groups on the standard switch. Every port group can use one or more physical NICs to handle their network traffic. If a port group does not have a physical NIC connected to it, virtual machines on the same port group can only communicate with each other but not with the external network.
Virtual machine network adapters or physical adapters connects to logical port on switch and each logical port is member of single port group. Each port group on standard switch is defined by a network label which must be unique to host. For example, you can create Production and Test environment port groups as virtual machine networks on the hosts that share the same broadcast domain on the physical network.
A VLAN ID, which restricts port group traffic to a logical Ethernet segment within the physical network, is optional. For port groups to receive the traffic that the same host sees, but from more than one VLAN, the VLAN ID must be set to VGT (VLAN 4095).
Create a vSphere Standard Switch
Step 1 – Login into vSphere client and navigate to ESXi host.

Step 2 – Go to Configure -> Networking -> Virtual Switches and click on Add Networking

- VMkernel Network Adapter – If you like to create a new VMkernel Adapter
- VM Port Group – If you need to create virtual machine port group
- Physical Network Adapter – If you want to manage physical adapters on ESXi host
So let’s take Virtual Machine Port group
Step 3 – Select New Standard Switch
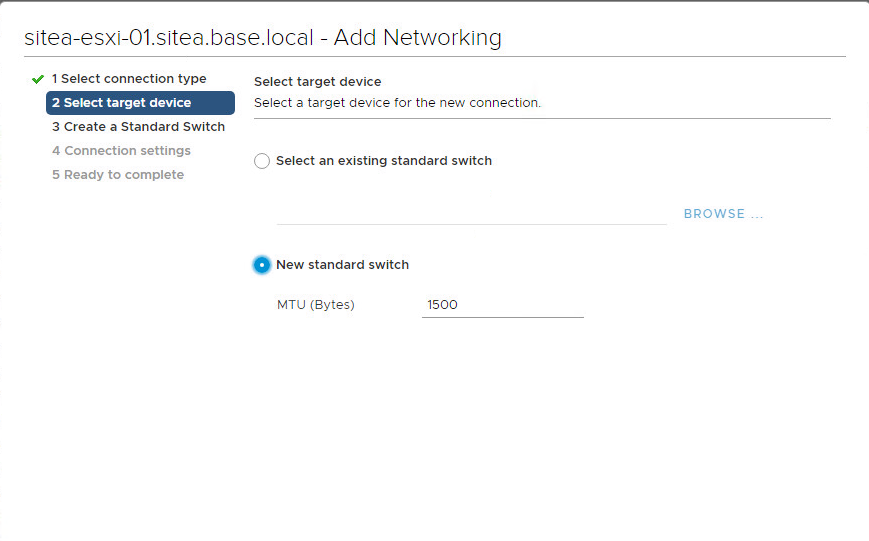
Step 4 – Assign the physical adapter to vSS by clicking on Green Plus sign. If no physical adapter is assigned then VMs on this standard switch will not be able to communicate with physical world.

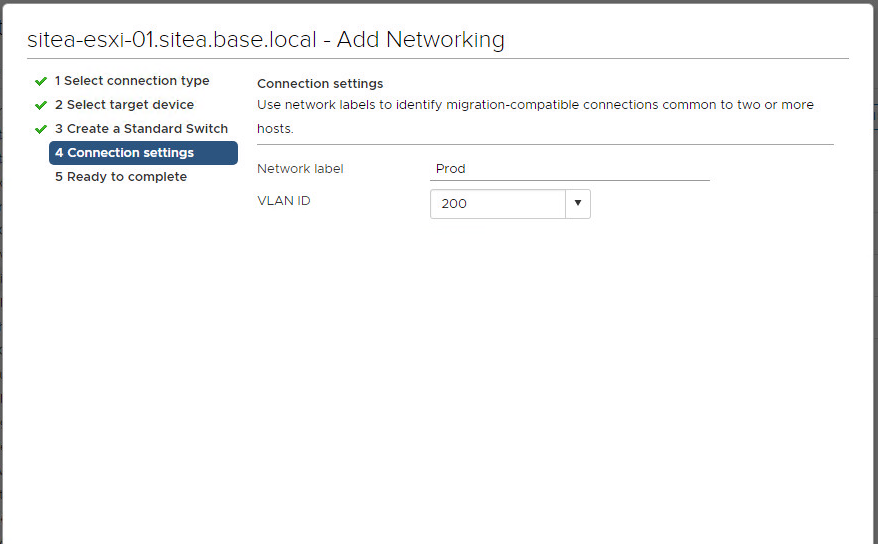
Step 5 – Provide a Network Label for VM port group and tag VLAN ID if traffic is VLAN marked.
Step 6 – Review settings and Click on Finish to save vSphere standard switch.
vSS Topology Diagram
A vSphere standard has topology similar to below:

Configuring vSphere Distributed Switch (VDS)
vSphere Distributed Switch provides centralized management and monitoring of the networking configuration of all hosts that are associated with the switch. You set up a distributed switch on a vCenter Server system, and its settings are propagated to all hosts that are associated with the switch.
vSphere Distributed Switch Architecture
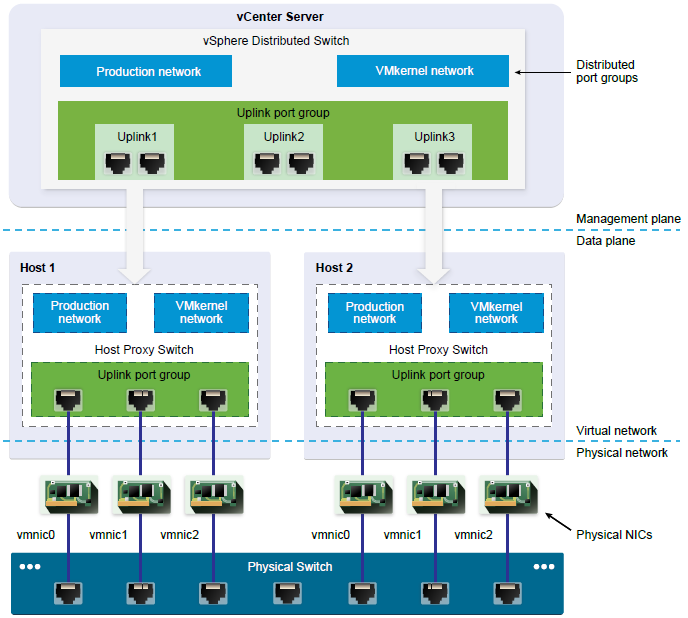
Virtual switch in vSphere consist of two planes:
- Data Plane: Data plane performs the function of packet switching, tagging, filtering etc.
- Management Plane: It is control structure from where you can configure settings of switch and data plane functionality.
In vSS, both dataplane and management plane lie on host. So, if you need to configure VSS or change settings, then you need to configure it individually for each and every host. This become a management headache.
So to resolve this, VDS separate these two planes i.e. data plane and management plane. Management plane of VDS lie in vCenter server whereas data plane of VDS lie on host. So by letting management plane resides on vCenter server, we can manage networking of hosts at datacentre level. Any configuration or monitoring of virtual networking can be managed centrally from vCenter server. The data plane section of the distributed switch is called a host proxy switch. The networking configuration that you create on vCenter Server (the management plane) is automatically pushed down to all host proxy switches (the data plane). In case my vCenter server goes down, still data plane is in ESXi hosts, so there will be no impact on virtual network and it will remain functional.
vSphere distributed switch two type of port groups which are used to provide consistent networking configuration for physical NICs, virtual machines and vmkernel services.
- Uplink Port group: An uplink port group or dvuplink port group is defined during the creation of the distributed switch and can have one or more uplinks. An uplink is a template that you use to configure physical connections of hosts as well as failover and load balancing policies. You map physical NICs of hosts to uplinks on the distributed switch.
- Distributed Port group: Distributed port groups provide network connectivity to virtual machines and accommodate VMkernel traffic. Each distributed port group is identified by using a network label, which must be unique to the current data center.
Create a vSphere Distributed Switch
Step 1 – Login into vSphere client and Navigate to Networking.
Step 2 – Right Click on DataCenter Object and Go to Distributed Switch -> New Distribute Switch
Step 3 – Provide a Name to Distribute Switch and click Next.

Step 4 – Select the version of vSphere distributed switch. Newer Version include new features but make sure, all ESXi Host should support vSphere distribute switch.
For example, if you select version as 6.6.0, then all ESXi hosts must be either 6.7 or above. Similarly, if you select version as 6.5.0, then all ESXi hosts must be either 6.5 or above. So select carefully.

Step 5 – Define the total number of uplink you want to assign to your distributed switch. Select NIOC will be available or not and if you want to create a default port group or not. These settings can be changed later on as well.

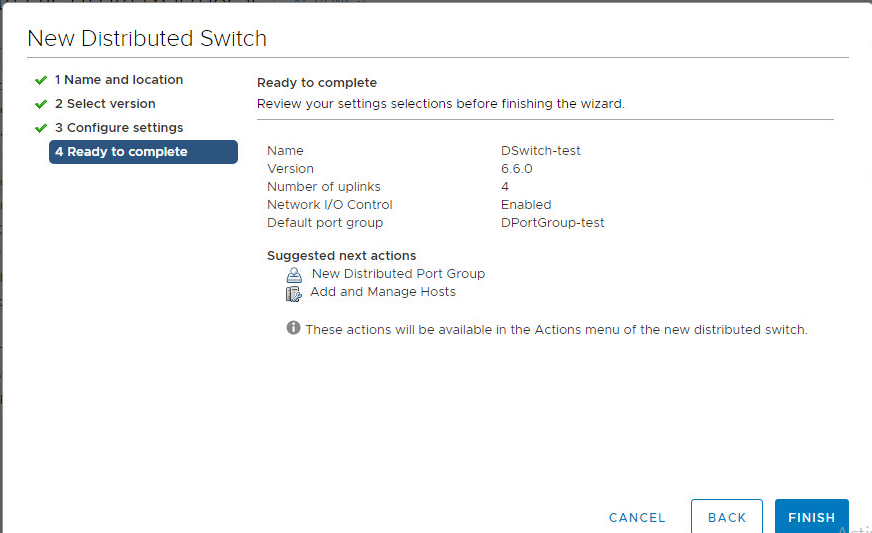
Step 6 – Review Settings and Click on Finish to create new distributed switch.
After creating vDS, we need to Add and Manage hosts, which I will cover as part of second blog.
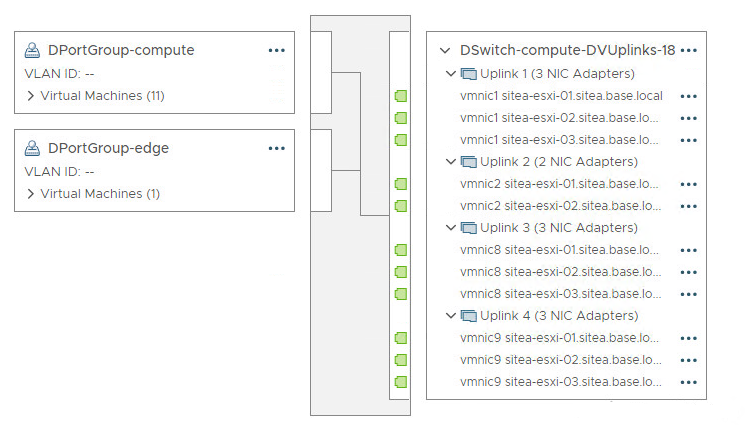
vDS Topology Diagram
Sample topology of vDS look like as below:
Configuring VMkernel Networking
VMkernel networking provide connectivity to hosts and handles traffic flow from various services such as vMotion, FT Logging, Provisioning, vSAN etc.
TCP/IP Stacks at VMkernel
vSphere support multiple TCP/IP stacks which are isolated from each other and have their own memory heap, ARP table etc. This helps in providing better isolation between different type of traffic.
- Default TCP/IP Stack: This default stack provide networking support for management traffic between vCenter server and ESXi hosts, and other system services such as FT, iSCSI etc.
- vMotion TCP/IP stack: Supports the traffic for live migration of virtual machines. Use the vMotion TCP/IP to provide better isolation for the vMotion traffic. After you create a VMkernel adapter on the vMotion TCP/IP stack, you can use only this stack for vMotion on this host.
- Provisioning TCP/IP stack: Supports the traffic for virtual machine cold migration, cloning, and snapshot migration. You can use the provisioning TCP/IP to handle Network File Copy (NFC) traffic during long-distance vMotion.
- Custom TCP/IP stacks: You can add custom TCP/IP stacks at the VMkernel level to handle networking traffic of custom applications.
There are various types of system traffic used by system services which are:
- Management Traffic
- vMotion Traffic
- Provisioning Traffic
- IP Storage and discovery
- Fault Tolerance Traffic
- vSphere Replication
- vSphere Replication NFC Traffic
- vSAN Traffic
Create a VMkernel Adapter
Step 1 – Login into vSphere client and navigate to ESXi host.
Step 2 – Go to Configure -> Networking -> VMkernel adapters
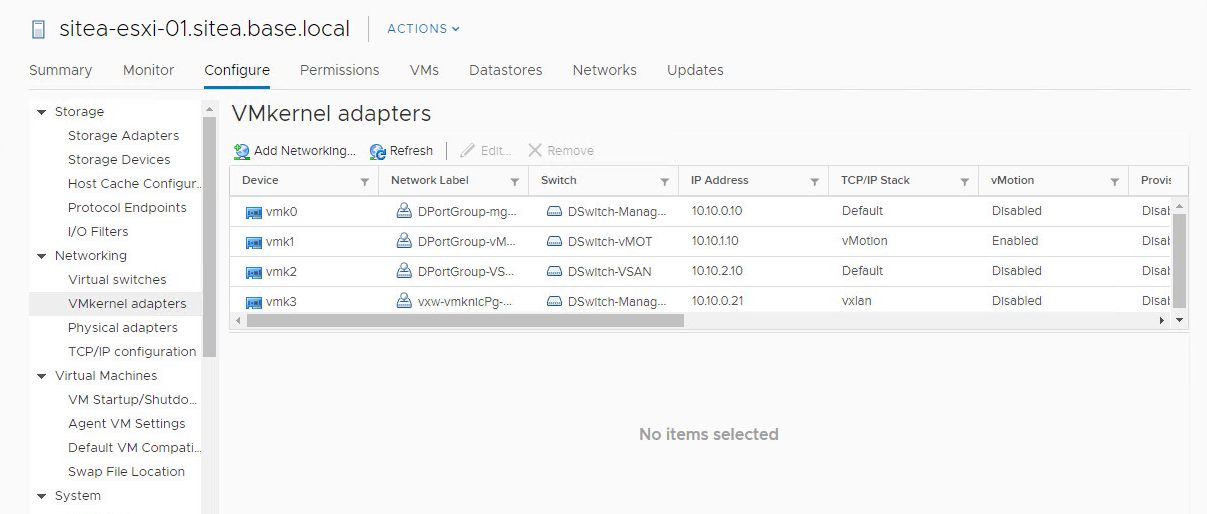
Step 3 – Click on Add Networking to add a new VMkernel Adapter

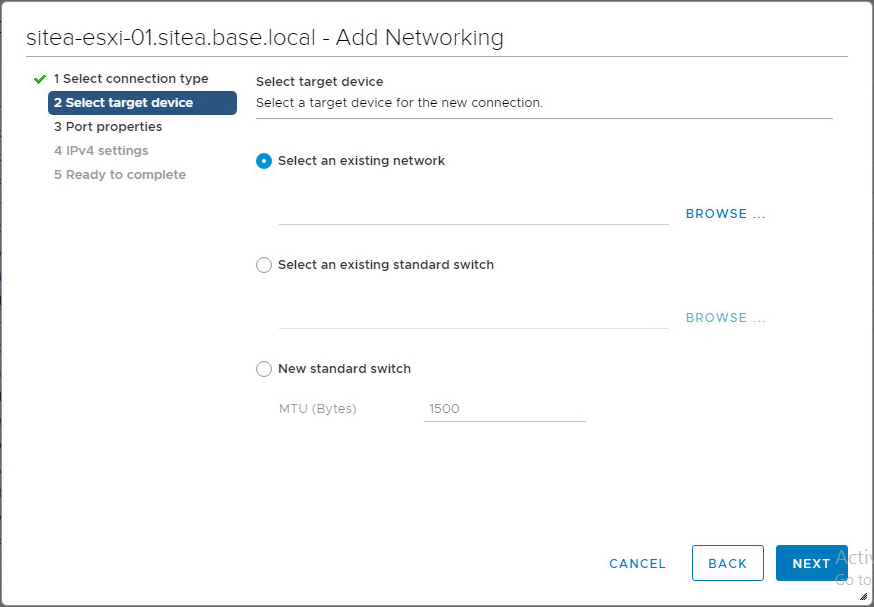
Step 4 – Select appropriate option and click Next
- Select an existing Network – To select distributed port group
- Select an existing standard switch – To select a standard which is already created
- New standard switch – To create a new standard switch for VMkernel adapter
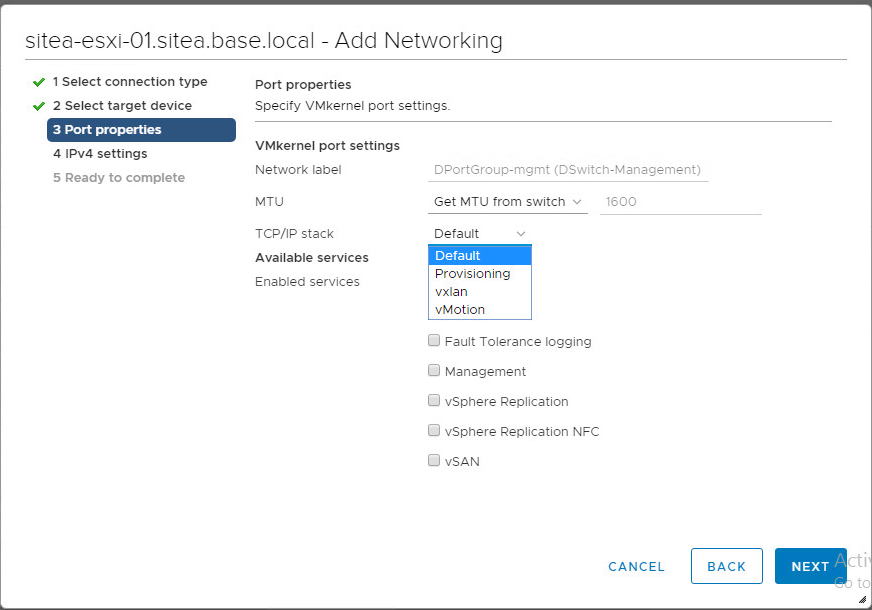
Step 5 – Here you will be presented with option to select TCP/IP stack and type of service traffic for VMkernel adapter.
In my case, I wanted to create it for vMotion so I selected vMotion TCP/IP Stack. You can enable multiple services by checking check box as well.
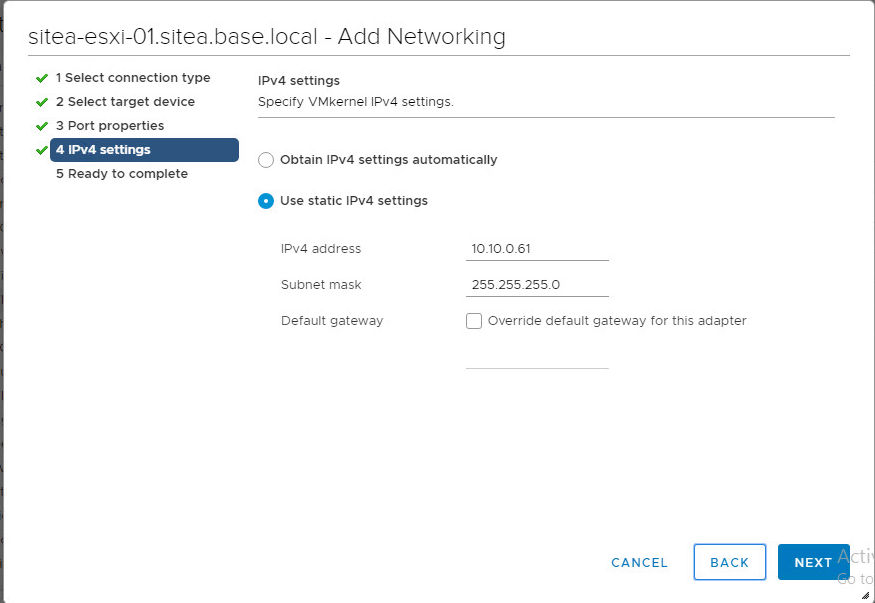
Step 6 – Provide the static IP address. If you wish to provide a different gateway than Default, you can override it here. If DHCP is enabled, then you can keep to obtain IPv4 address automatically.
Step 7 – Review the settings and click on finish to create vmkernel adapter.

Create a Custom TCP/IP Stack
Step 1 – Open SSH connection to ESXi Host
Step 2 – Login as root user.
Step 3 – Run below esxcli command to create a custom TCP/IP Stack
esxcli network ip
netstack add -N="stack_name"
Backing Up and Restoring Networking Configurations
vCenter server allows to backup and restore configuration to vSphere distributed switch. We can restore VDS in case of a database or upgrade failure. Backup of vDS can be used as a template to create new vDS in same or new environment.
Export vSphere Distributed Switch Configurations
Step 1 – Login into vSphere client and navigate to Networking.

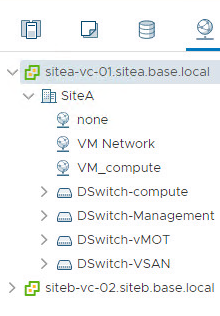
Step 2 – Right Click on Distributed Switch of which you want to take backup. In my case, I wanted to take backup of DSwitch-compute.

Step 3 – Go to Settings -> Export Configuration

Step 4 – Click Ok and configuration will be exported in a zip file.

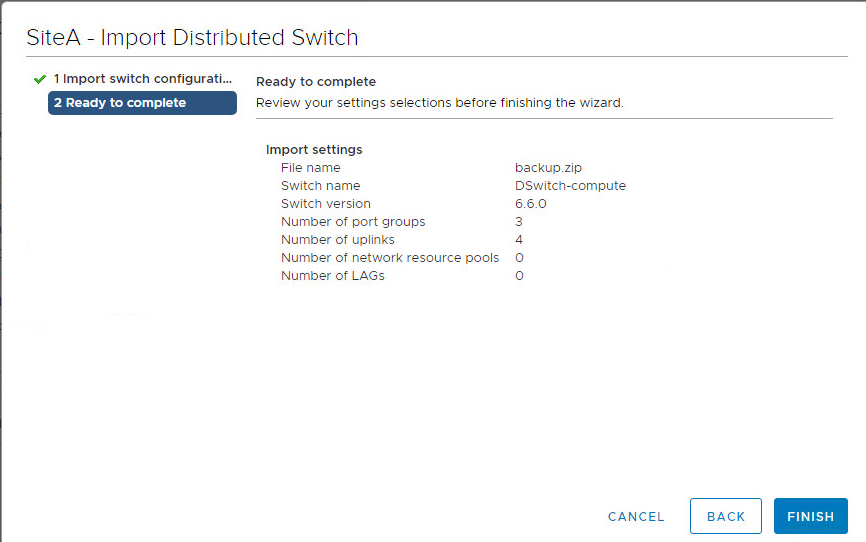
Import a vSphere Distributed Switch Configuration
Step 1 – Login into vSphere client and Navigate to Networking.
Step 2 – Right click on DataCenter object and go to Distributed Switch -> Import Distribute Switch

Step 3 – Click on browse and provide zip file path saved earlier.

Step 4 – Click Next, review configuration and click on Finish to import distributed switch from backup.
vSphere Networking Rollback
By rolling configuration changes back, vSphere protects hosts from losing connection to vCenter Server as a result from misconfiguration of the management network. In vSphere networking rollback is enabled by default. However, you can enable or disable rollbacks at the vCenter Server level.
The following examples of changes to the host networking configuration might trigger a rollback:
- Updating the speed or duplex of a physical NIC.
- Updating DNS and routing settings.
- Updating teaming and failover policies or traffic shaping policies of a standard port group that contains the management VMkernel network adapter.
- Updating the VLAN of a standard port group that contains the management VMkernel network adapter.
- Increasing the MTU of management VMkernel network adapter and its switch to values not supported by the physical infrastructure.
- Changing the IP settings of management VMkernel network adapters.
- Removing the management VMkernel network adapter from a standard or distributed switch.
- Removing a physical NIC of a standard or distributed switch containing the management VMkernel network adapter.
- Migrating the management VMkernel adapter from vSphere standard to distributed switch.
Examples which may trigger rollback in case of vSphere distributed switch:
- Changing the MTU of a distributed switch.
- Changing the following settings in the
distributed port group of the management VMkernel network adapter:
- Teaming and failover
- VLAN
- Traffic shaping
- Blocking all ports in the distributed port group containing the management VMkernel network adapter.
- Overriding the policies on at the level of the distributed port for the management VMkernel network adapter.
Disable Network Rollback
Step 1 – Login Into vSphere client and navigate to vCenter Server.
Step 2 – Go to Configure -> Settings -> Advanced Settings

Step 3 – Click on Edit Settings and select key “config.vpxd.network.rollback” and change its value to false.

Step 4 – Click Ok and restart vCenter server to apply settings.
I hope you like this blog on virtual networking. I will soon publish second part of this blog which will talk about managing virtual switches. Please let me know your thought on same.
Further Reading and Reference:

Reblogged this on Nguoidentubinhduong.
LikeLike